


* 'Slice position editor' button
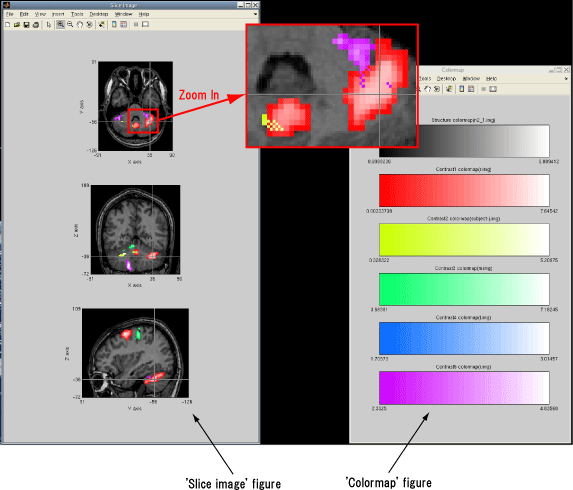
The Slice position of the Structure image on the 'Sliced image' figure is set with the 'Slice position' editor window which appears by clicking on the 'Slice position editor' button.* 'Detailed parameters editor' button
To display a sliced image to the 'Sliced image' figure, set the detailed parameter on the 'Detailed parameters(Draw)' editor window which appears by clicking on the 'Detailed parameters editor' button.* 'Draw multi slice' button
The 'Multi sliced image' figure appears as below by clicking on the 'Draw multi slice' button. The 'Multi sliced image' figure is displayed at intervals of the selected voxel size of the first Contrast data(Contrast 1), which is extracted by the selected slice position on the 'Slice position' editor window and the selected coordinate axis on 'Multi slice axis' popup menu.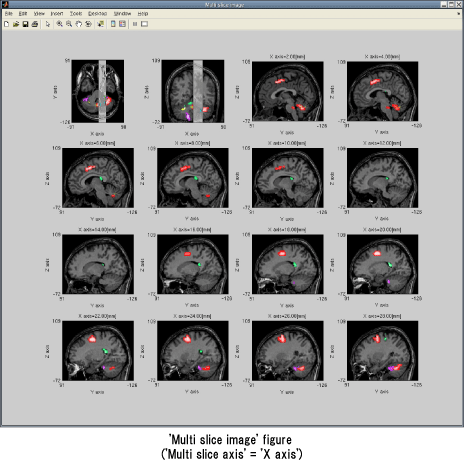
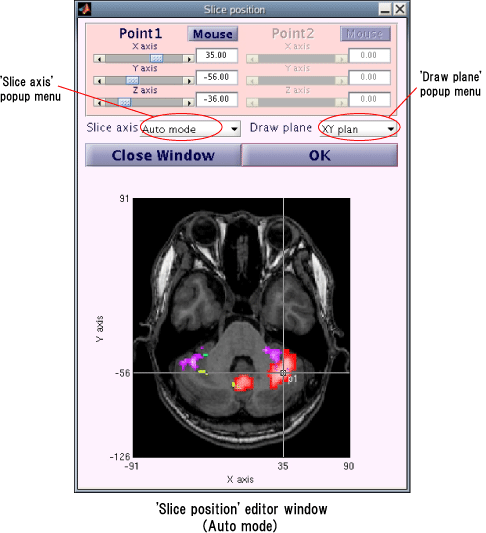
(a) 'Auto' mode
In 'Auto' mode, the slice position is set by one point. The slice position is specified by slider and numerical value box of Point1. To set a slice position, you can click on the image at the bottom of the 'Slice position' editor window after clicking on the 'Mouse' button of left side of Point1. Please click 'OK' button when the slice position is decided. The image is displayed piled up the Contrast data and the Structure image which is with the sliced XY plane image along the X axis, XZ plane image along the Y axis, and YZ plane image along the X axis.(b) 'Manual axis' mode
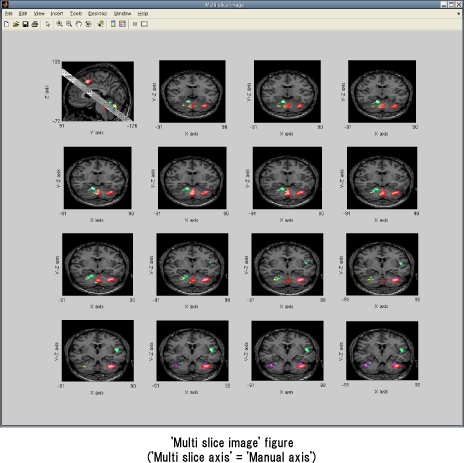
In 'Manual axis' mode, two points (Point1 and Point2) are specified, then the line connects Point1 and 2 is drown at the bottom of the 'Slice position' window. This straight line is the 'slice line'. After chose Point1 and 2, the slice line appears on the plane sliced image (upper of 'Slice image' figure) which is selected with the 'Draw plane' popup menu.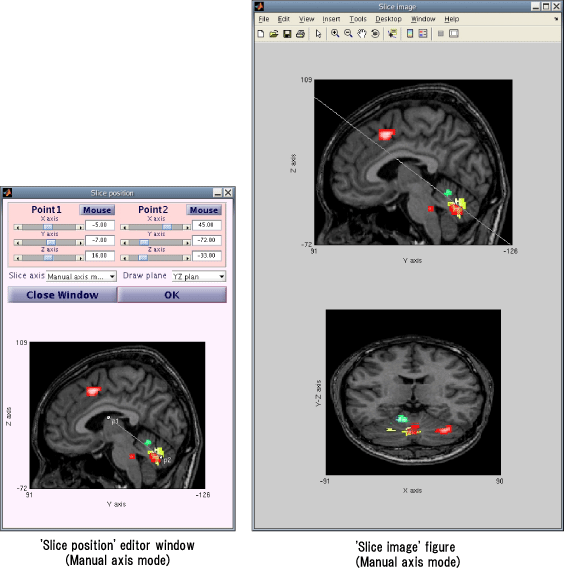
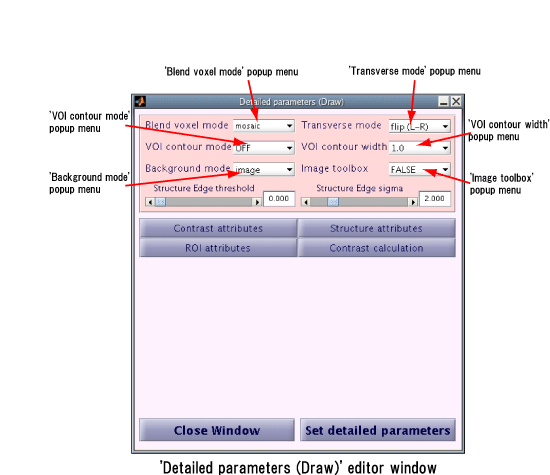
* 'Blend voxel mode' popup menu
'Blend voxel mode' popup menu switches the voxel display with which two or more overlapped Contrast data. Each contrast data color is displayed with 1 pixel each for the 'Mosaic' mode, and the strong color contrast data is displayed with the mixes of two kinds of the contrast data for the 'Color mixture' mode.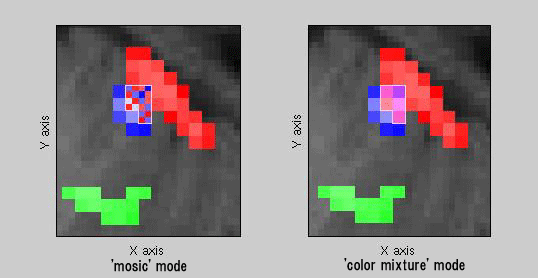
* 'Transverse mode' popup menu
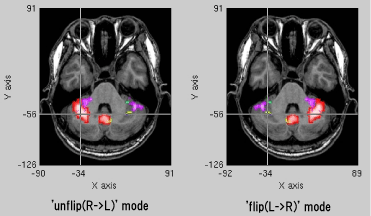
Reversing/non-reversing X axially of the slice image is specified with 'Transverse mode' popup menu. A reversed slice image X axially is displayed with 'flip (L-R)' mode, and the original slice image is displayed with 'unflip (R-L)' mode.| 'unflip(R->L)'
mode |
'flip(L->R)'
mode |
|
| VOXEL number |
Small -> Large |
Small -> Large |
| X axis |
Right -> Left |
Left ->
Right |
* 'VOI contour mode' popup menu, 'VOI contour width' popup menu
'VOI contour mode' popup menu, and 'VOI contour width' popup menu set the display mode of the outer circumferential line of the group (VOI:Volume Of Interest) of the Contrast data. The line which is specified the size by the 'VOI contour width' of 'VOI contour mode' is displayed on the outer circumferential. If the 'VOI contour mode' is 'NORMAL', the outer line is displayed in each VOI. If it is 'AND', the outer line is displayed only in the part where two or more VOI comes in succession. If it is 'OR', the outer line is displayed only in the part the outside of VOI. And more, when 'Contrast1', 'Contrast2', and 'Contrast3' . . . is selected, the outer line is displayed only in the out of VOI made by the selected Contrast data.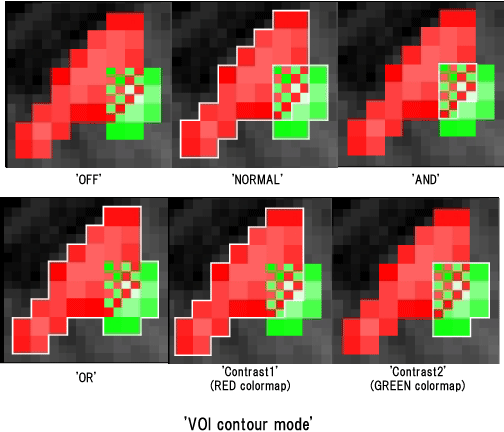
* 'Background mode' popup menu
'Background mode' popup menu selects the image type that becomes a base of the Contrast data. When 'Background mode' popup menu is 'Image', the Structure image is displayed. 'Edge' shows the edge of the Structure image after image processing of the Structure image. In 'Image&edge' mode, the edge image is piled up to the Structure image.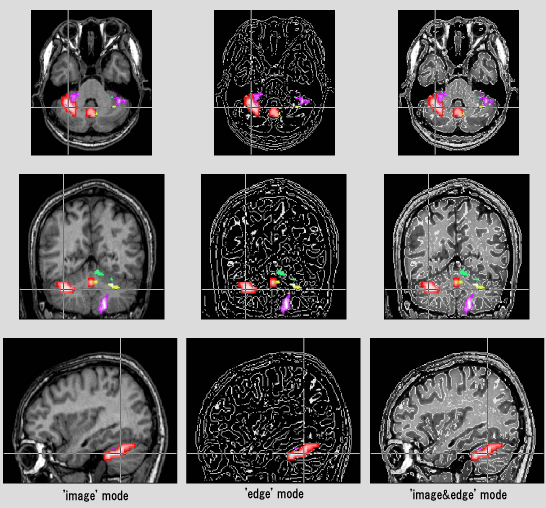
* 'Image toolbox' popup menu
'Image toolbox' popup menu specifies whether to use the Image processing toolbox when 'Edge' or 'Image&edge' is selected with 'Background mode' popup menu. When 'TRUE' is selected, the edge() function of the Image processing toolbox is used to detect the edge of the Structure image. When it's 'FALSE', an equivalent module to the edge() function that the author prepared is used. Please specify 'TRUE' with the computer-mediated environment of Image processing toolbox.* 'Background Edge threshold', 'Background Edge sigma'
'Background Edge threshold' and 'Background Edge sigma' are a detection parameter of the edge of the Stracture image. Please refer more details to the help of the edge() function at the 'Laplacian method of Gaussian'. Please note that the voxel which has lower than 'Structure MIN' of 'Draw parameters' panel is disregarded.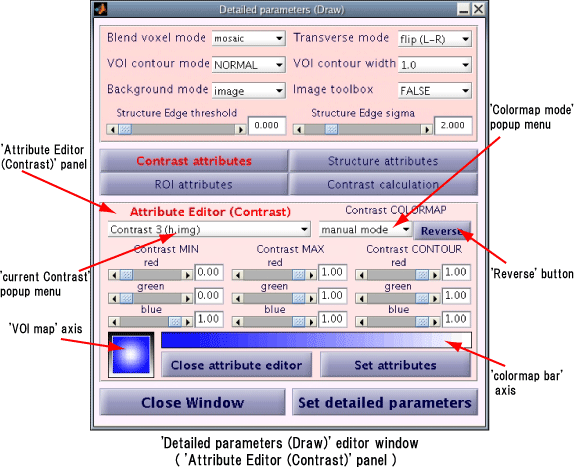
* 'current Contrast' popup menu
Select the Contrast data to set the display format. (Hereinafter, the selected contrast data with the 'Current Contrast' popup menu is called as current Contrast.) When Contrast number ('Contrast1','Contrast2','Contrast3'...) is selected with the 'Current Contrast' popup menu, the display format of the selected Contrast data is set. The colormap for the selected Contrast data is displayed in 'Colormap bar' axis, and VOI and the outline for the current Contrast data is displayed on the Structure image in 'VOI map' axis. On the other hand, when 'AND contour' is selected, the display format of voxel that comes in succession two or more Contrast data is set. The 'colormap bar' is made as non-display. VOI and the outline for 'Blend voxel mode' popup menu are displayed with 'mosaic' mode in 'VOI map' axis.
* 'Colormap mode' popup menu
Select colormap of the current Contrast data. When 'Manual' is selected with the 'Colormap mode' popup menu, the maximum and minimum display color value of the Contrast data are set with GUI that sets 'Contrast MIN' and 'Contrast MAX'. Other than 'Manual' is selected, it's displayed as MATLAB colormap. Please refer to help of the colormap() function for details.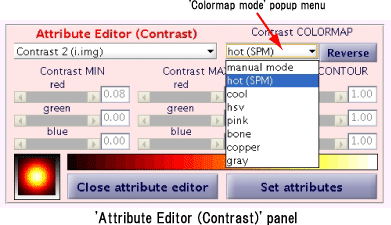
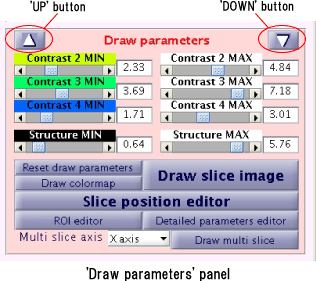
* 'Contrast MIN', 'Contrast MAX'
The display color of minimum value ('Contrast MIN') of the current Contrast data and maximum value ('Contrast MAX') is set. (When 'Colormap mode' popup menu is only 'Manual', it is possible to set it. )* 'Contrast CONTOUR'
The color of the profile line of VOI of the current Contrast data is set. When the Contrast number (current Contrast number) is selected with 'Current Contrast' popup menu, 'Contrast CONTOUR' can be set only when any of 'NORMAL', 'OR' or the current Contrast number has been selected with 'VOI contour mode' popup menu. On the other hand, when 'AND contour' has been selected with 'Current Contrast' popup menu, 'Contrast CONTOUR' can be set only when 'AND' is selected with the 'VOI contour mode' popup menu.*'Reverse' button
Colormap of the current Contrast data is reversed.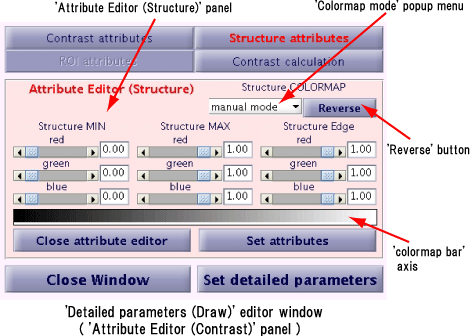
* 'Colormap mode' popup menu
Select colormap of the Structure image. When 'manual' is selected in the 'Colormap mode' popup menu, the value of the maximum and minimum display color for the Contrast data are set with GUI which sets 'Contrast MIN' and 'Contrast MAX'. Other than 'Manual' is selected, it's displayed as MATLAB colormap. Please refer to help of the colormap() function for details.* 'Structure MIN', 'Structure MAX'
The display color of minimum value ('Contrast MIN') of the current Contrast data and maximum value ('Contrast MAX') is set. (When 'Colormap mode' popup menu is only 'Manual', it is possible to set it. )* 'Structure Edge'
Display color is set with the edge that is read from the Structure image. (Only if 'edge' or 'image&edge' are selected in 'Background mode' popup menu.)* 'Reverse' popup menu
Colormap of the Structure image is reversed.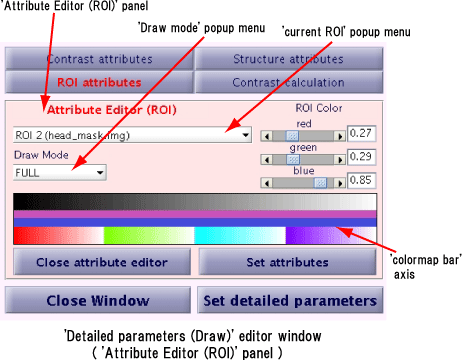
* 'current ROI' popup menu
Select the ROI data to set the display format. (Hereinafter, the selected ROI data in the 'current ROI' popup menu is called as current ROI.)* 'ROI Color'
Set the diplay color for the current ROI.* 'Draw Mode' popup menu
Set the display mode of the current ROI. When 'FULL' is selected, Roi data is marked out. If 'CONTOUR' is selected, only outline of the ROI data is displayed. ROI data is not display when 'OFF' is selected.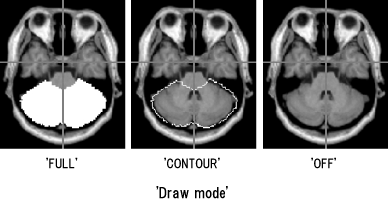
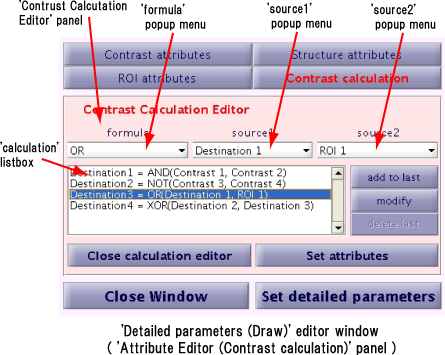
* 'formula' popup menu, 'source1' popup menu, 'source2' popup menu
The evaluation formula supports four kinds evaluation function such as 'AND', 'OR', 'XOR' and 'NOT'. With 'AND', selected data is displayed only overlapped area with 'source1' and 'source2'. The area for both 'source1' and 'source2' is displayed, but no other area is shown when 'OR' is selected. With 'XOR', exclusive duplicated region of both 'source1' and 'source2' is displayed. With 'NOT', the area that remove 'source2' from 'source1' is displayed.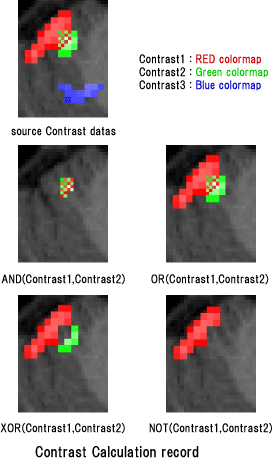
* 'add to list' button
The evaluation formula is added at the end of 'Calculation' listbox when 'Add to list' button is clicked after the evaluation function is specified with 'Formula' popup menu, and the evaluation data is specified with 'Source1' popup menu and 'Source2' popup menu.* 'modify' button
When the evaluation formula with the 'Calculation' listbox (Hereinafter, the selected evaluation formula is called as current evaluation formula)is selected by clicking, the content of the current evaluation formula is set to 'Formula' popup menu, 'Source1' popup menu, and 'Source2' popup menu. Under such a condition, when 'Modify' button is clicked after 'Formula' popup menu, 'Source1' popup menu, and 'Source2' popup menu are operated, the current evaluation formula is updated.* 'delete last' button
When 'Delete last' button is clicked without selecting the evaluation formula of 'Calculation' listbox, the last evaluation formula is deleted from the 'Calculation' list box.

